Hyper-V, while better than the alternatives, has some short comings when it comes to the client; copying files is hard and screen support is not ideal.
That is why I prefer using the host to access the image through the network stack with Remote Desktop or just the browser.
Here are the steps to set up the communication:
- Add a virtual adapter
In Hyper-V this is accomplished on the host in "Virtual Network Manager" by adding an "Internal" network I usually name "example.com"
- Set up adapter inside the image
Ensuring the image is shut down (and not in save state mode) I add "Network Adapter" and select the net created in step 1.
After restarting the image I open "Network Connections" and set the IP to 192.0.2.110, mask 255.255.255.0 and optionally default gateway to 192.0.2.100.
Last I turn off firewall completely for this card (steps depends).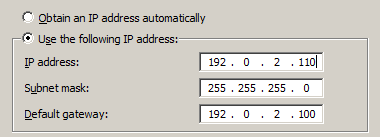
- Set up adapter on host
On "Network Connections" I set up the adapter manually with IP 192.0.2.100, mask 255.255.255.0. Advanced: if I have AD inside the image and the host is part of the domain I set DNS server to 192.0.2.110.
If I don't use DNS in an image (or the host) I change the "hosts" file (or lmhosts) with notepad c:\Windows\System32\drivers\etc\hosts and add lines for the names we want the inside of the image to be known, for instance:- intranet.contoso.com 192.0.2.110
- www.contoso.com 192.0.2.110
- contoso.com 192.0.2.110
- contosoApp 192.0.2.110

- Test
In host start cmd and "ping 192.0.2.110"
In image start cmd and "ping 192.0.2.100"
From host start mstsc and open "contosoApp"
From host start iexplore and navigate "intranet.contoso.com" - Result
I now browse the image from the host and use remote desktop. This way screen works better and browser app (and Visual studio etc) works much much better.
